.png)
Every parent's heart stops when they see their child fall face-first on the playground. That moment of panic becomes real terror when you notice blood and a missing tooth. Understanding what to do in those critical first minutes can mean the difference between saving and losing a tooth forever.
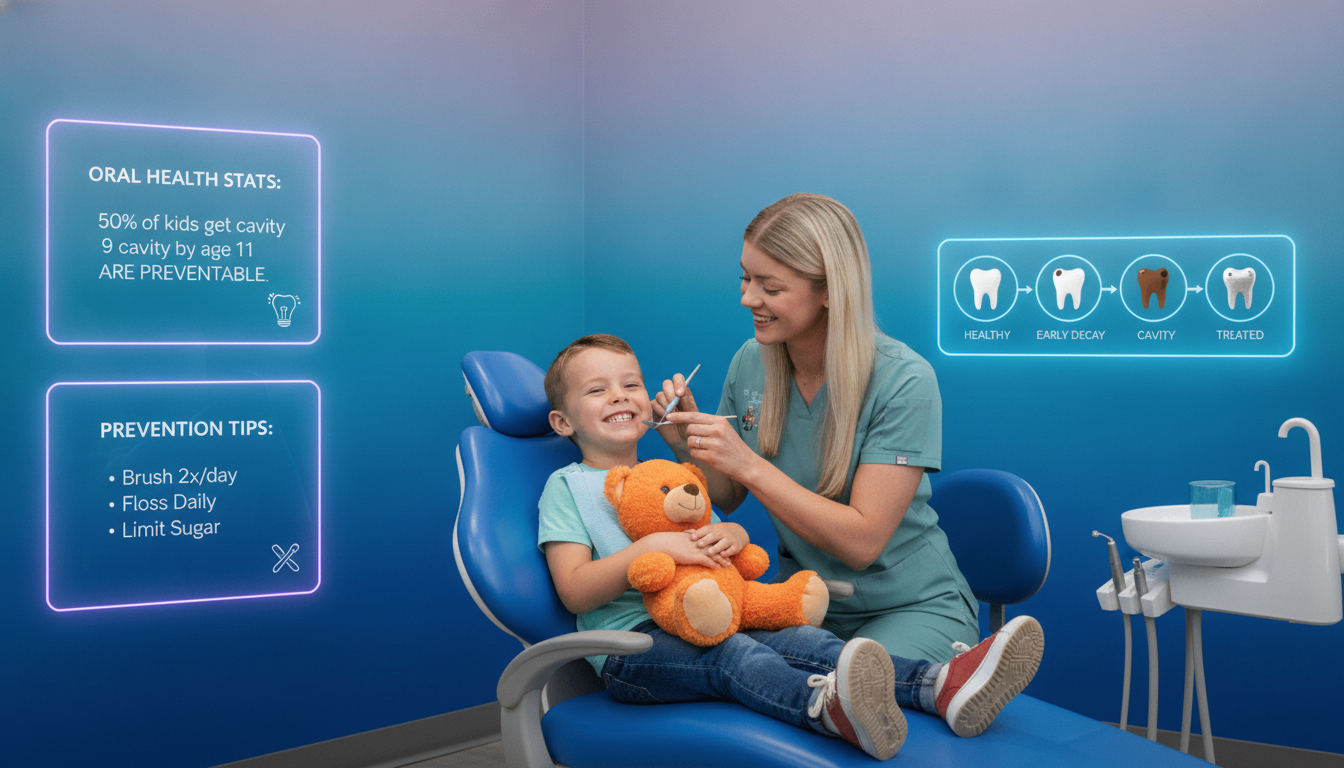
Dental injuries affect 20 to 30 percent of children around the world. These accidents happen most often during two key periods: the toddler years when kids are learning to walk (ages 2 to 3) and the active pre-teen years (ages 8 to 10). The good news? Knowing how to respond quickly can protect your child's smile for life.
The Golden Hour: Why Time Matters Most
When a permanent tooth gets knocked out, you have a narrow window to save it. Dental professionals call this the "Golden Hour," but really, you have just 30 to 60 minutes to give that tooth the best chance of survival. After this time passes, the cells on the tooth root start dying, making successful replanting much harder.
This guide follows the latest recommendations from the International Association of Dental Traumatology and the American Academy of Pediatric Dentistry. But before we dive into specific treatments, you need to understand one critical rule: baby teeth and permanent teeth require completely different care.
Baby Teeth vs. Permanent Teeth: Why It Changes Everything
The biggest mistake parents make is treating all dental injuries the same way. What works for an adult tooth can seriously damage a baby tooth, and vice versa.
Baby Teeth (Primary Teeth): These are the teeth your child gets starting around 6 months old. They start falling out naturally around age 6. If a baby tooth gets knocked out, you should NEVER try to put it back in. Replanting a baby tooth can damage the permanent tooth growing underneath it or cause a dangerous infection.
Permanent Teeth (Adult Teeth): These teeth need to last a lifetime. They start coming in around age 6, beginning with the front bottom teeth and the first molars. If a permanent tooth gets knocked out, your main goal is getting it back in the socket as fast as possible.
Not sure which type of tooth you're dealing with? Here's a quick guide:
- If your child is under 6 years old, it's almost certainly a baby tooth
- If your child is over 12 years old, it's definitely a permanent tooth
- Between ages 6 and 12, check which tooth it is (front teeth transition first, then back teeth)
Your 5-Minute Emergency Action Plan
When dental trauma happens, follow these steps in order:
1. Check for Serious Injuries First
Before you worry about the tooth, make sure your child doesn't have a more serious problem. Look for these warning signs:
- Loss of consciousness (even for a few seconds)
- Severe headache or dizziness
- Nausea or vomiting
- Clear fluid draining from the nose or ears
- Confusion or unusual behavior
If you see any of these signs, call 911 or go to the emergency room immediately. The tooth can wait.
2. Control the Bleeding
Mouth injuries bleed a lot because the area has many blood vessels. This can look scary, but it's usually not dangerous. Have your child bite down gently on clean gauze or a soft cloth for 10 to 15 minutes. You can also use a cold, damp tea bag (the tannic acid helps blood clot faster).
3. Find the Tooth and Handle It Correctly
If the tooth comes out completely, find it right away. Pick it up only by the crown (the white part you see when someone smiles). Never touch the root (the pointy part that sits in the gum). The root has special cells that help the tooth reattach, and touching it can kill these cells.
4. Rinse the Tooth Gently
If the tooth is dirty, rinse it very gently with cold water or saline solution for just 10 seconds. Do not scrub it, use soap, or wrap it in tissue. Keep the rinsing time short to protect those important root cells.
5. Replant or Store (Depending on Tooth Type)
For Permanent Teeth: Try to put the tooth back in its socket right away if possible. Gently push it in place and have your child hold it there by biting on gauze. If your child is too upset or young to cooperate, or if you can't get the tooth in correctly, move to storage immediately.
For Baby Teeth: Do not attempt replanting. Move straight to storage if the dentist needs to see it.
Storage Options (Best to Worst):
- Cold milk (whole milk works best because of its pH and nutrients)
- Saline solution (contact lens solution or wound wash)
- Your child's saliva (have them spit in a small container and put the tooth in)
- Inside your child's cheek (only if they're old enough not to swallow it)
- Cold water (last resort, but better than letting it dry out)
Never store a tooth in tap water for more than a few minutes. The water causes the root cells to swell and die. Never wrap it in tissue or cloth, as this dries out the tooth.
6. Get to a Dentist Within 30 Minutes
Call your pediatric dentist immediately. Most dental offices have emergency contact numbers for after-hours situations. If you can't reach your dentist, go to an emergency dental clinic or hospital emergency room that has dental services.
For families in Lafayette and surrounding areas, having an emergency dental contact saved in your phone before an accident happens can save precious minutes. At Make Your Kids Smile, we provide emergency dental care instructions and can guide you through immediate steps over the phone while you're on your way.
Understanding Different Types of Dental Injuries
Not all dental trauma involves a tooth falling out completely. Here are the main types of injuries you might see:
Fractured (Broken) Teeth
Minor Enamel Chips: Just the outer white coating broke off. Your child might have a sharp edge that bothers their tongue. The dentist can smooth it down or add a small filling to restore the shape. This usually doesn't hurt much.
Dentin Fractures: The break goes deeper into the yellow layer under the enamel. Your child might feel sensitivity to hot or cold. The dentist will likely place a filling or crown to protect the tooth.
Complicated Fractures: The break exposed the tooth's nerve (pulp). You'll see a pink or red spot in the center of the broken tooth. This requires immediate treatment within 24 hours to save the tooth. The dentist will perform a procedure called a pulpotomy (for baby teeth) or root canal treatment (for permanent teeth).
Luxation Injuries (Moved But Not Out)
Concussion: The tooth took a hard hit but didn't move. It might feel tender when your child bites down. Usually just observation and a soft diet for a week.
Subluxation: The tooth is loose and wiggles but stays in position. It may bleed a little at the gumline. Treatment involves a soft diet and careful monitoring. Many teeth tighten up on their own.
Lateral Luxation: The tooth got pushed sideways (toward the tongue or cheek). The dentist might need to reposition it. Baby teeth often get left alone to reposition naturally, while permanent teeth usually need repositioning and splinting.
Extrusive Luxation: The tooth got pulled partially out of its socket. It looks longer than the tooth next to it. Permanent teeth typically get pushed back in and splinted. Baby teeth might be extracted to prevent problems.
Intrusive Luxation: The tooth got pushed up into the gum (it looks shorter or might not be visible at all). This is more common with baby teeth. Many baby teeth will re-erupt on their own over 6 months. Permanent teeth often need surgical repositioning and orthodontic help to pull them back down.
Avulsion (Complete Knock-Out)
This is the most serious dental emergency. For permanent teeth, every minute counts. Studies show that teeth replanted within 5 minutes have a 90 percent survival rate. After 60 minutes, survival drops to less than 5 percent.
What to Expect at the Dentist
The dentist will do several things to assess and treat the injury:
Examination: They'll check all teeth, even ones that don't look damaged. Sometimes teeth next to the obvious injury also have problems you can't see.
X-rays: Digital x-rays show root fractures, jaw fractures, and whether baby tooth injuries might have damaged the permanent tooth underneath.
Vitality Testing: For older children, the dentist might use special tests to check if the tooth's nerve is still alive. Modern offices use tools like Pulse Oximetry or Laser Doppler Flowmetry, which measure blood flow in the tooth. These work better than old-fashioned cold tests, especially right after an injury.
Splinting: If a permanent tooth was replanted or moved, the dentist will attach it to neighboring teeth with a flexible wire and composite material. This splint usually stays in place for 2 weeks (sometimes longer for severe injuries). The splint needs to be flexible so the tooth can move slightly, which helps healing.
Medications: Your child might need antibiotics if the tooth was out of the mouth for a long time or if the injury was dirty. The dentist will also check your child's tetanus vaccination status.
The Healing Process: What Happens Next
Follow-Up Appointments
Dental trauma requires careful monitoring. You'll typically have check-ups at:
- 1 week after the injury
- 3 to 4 weeks after the injury
- 3 months after the injury
- 6 months after the injury
- 1 year after the injury
- Yearly for several years after that
The dentist checks for complications at each visit. Some problems don't show up for months or even years after the original injury.
Possible Complications
Even with perfect treatment, injured teeth can develop problems:
Discoloration: The tooth might turn gray, yellow, or pink. Sometimes this is temporary, but it can also mean the nerve dies.
Root Resorption: The body starts dissolving the tooth root, treating it like a foreign object. This shows up on x-rays and can lead to tooth loss.
Infection: The tooth or surrounding bone can get infected weeks or months later. Watch for pain, swelling, or a pimple on the gum.
Pulp Necrosis: The nerve inside the tooth dies. This might not hurt at first but leads to infection if not treated.
Ankylosis: The tooth fuses to the bone and stops developing normally. This mainly affects growing children and can cause bite problems.
Taking Care of Injured Teeth at Home
Your dentist will give you specific instructions, but general care includes:
Diet Modifications: Stick to soft foods for at least 1 to 2 weeks. Good options include:
- Smoothies with yogurt, bananas, and berries (vitamin C helps healing)
- Scrambled eggs with cheese (protein for tissue repair)
- Oatmeal with nut butter (zinc supports immune function)
- Mashed sweet potatoes (vitamin A for cell growth)
- Soft pasta with sauce
- Soups and broths
Avoid hard, crunchy, or chewy foods like apples, carrots, popcorn, and gum.
Pain Management: Over-the-counter children's ibuprofen or acetaminophen usually handles pain well. Follow dosing instructions based on your child's weight.
Oral Hygiene: Keep brushing, but be very gentle around the injured tooth for the first week. Use a soft-bristled brush. Your dentist might recommend a chlorhexidine rinse to prevent infection.
Activity Restrictions: No contact sports or rough play for at least 2 weeks. If your child plays sports regularly, they'll need a custom mouthguard before returning to play.
Special Situations and Problem-Solving
If You Live Far from a Dentist
Families in rural areas face extra challenges during dental emergencies. If the nearest pediatric dentist is more than an hour away:
- Keep a dental emergency kit at home with Hank's Balanced Salt Solution (available at pharmacies as Save-A-Tooth or EMT Tooth Saver). This special solution keeps a tooth alive for up to 24 hours.
- Call ahead so the dental office can prepare for your arrival
- Consider having your regular dentist's emergency contact and the contact for the nearest hospital with dental services
Helping Your Child Cope Emotionally
Dental injuries can affect more than just physical health. Children who lose or damage visible front teeth often experience:
- Anxiety about smiling or talking in public
- Teasing from peers
- Reluctance to eat in front of others
- General dental fear that makes future appointments difficult
Support your child by:
- Staying calm yourself (children pick up on parent anxiety)
- Explaining treatments in simple, honest terms
- Praising their bravery
- Maintaining normal social activities
- Considering temporary cosmetic solutions if a permanent tooth is lost
- Working with a child psychologist if anxiety becomes severe
Many pediatric dentists train specifically in helping anxious children. Don't hesitate to mention your child's fears at appointments.
Financial and Insurance Considerations
Dental trauma treatment can be expensive. A single injured permanent tooth might need care for years, with total costs potentially exceeding $20,000 over a lifetime (including root canals, crowns, implants, or bridges in adulthood).
Protect yourself financially by:
- Taking clear photos of the injury immediately
- Keeping detailed notes about when and how it happened
- Getting copies of all dental records and x-rays
- Understanding your dental insurance coverage (many plans cover trauma differently than routine care)
- Checking if your homeowner's or renter's insurance might apply
- Asking about payment plans at the dental office
- Looking into financing options like CareCredit for large expenses
If the injury happened at school or during organized sports, additional insurance might apply.
Prevention: Stopping Injuries Before They Happen
While you can't prevent every accident, you can reduce your child's risk significantly.
Mouthguards for Sports
Custom-fitted mouthguards reduce dental injury risk by 60 times compared to playing without protection. The American Dental Association recommends mouthguards for any sport with risk of falls or contact:
- Football
- Hockey
- Basketball
- Soccer
- Wrestling
- Baseball/Softball
- Skateboarding
- Biking
- Lacrosse
- Martial arts
Custom vs. Store-Bought: Custom mouthguards made by your dentist fit better, stay in place during play, and don't interfere with breathing or speaking. They cost more ($150 to $300) but offer superior protection. Store-bought boil-and-bite guards ($20 to $40) work better than nothing but provide less protection and often feel uncomfortable, leading kids to take them out during games.
Childproofing Your Home
Most dental injuries in young children happen at home. Pay attention to these common hazards:
For Toddlers Learning to Walk:
- Add corner guards to coffee tables and furniture with sharp edges
- Put non-slip mats in bathtubs and showers
- Install safety gates at stairs
- Cushion fireplace hearths
- Avoid hardwood or tile floors in play areas if possible (or use thick play mats)
For All Ages:
- Don't let children run with toys, toothbrushes, or food in their mouths
- Use car seats and seat belts properly at all times
- Keep play areas clear of tripping hazards
- Supervise playground time, especially on climbing equipment
- Teach safe behavior around pools (no running on wet surfaces)
Building Safe Habits
Start teaching children about dental safety early:
- Model careful behavior yourself
- Explain why rules like "no running in the house" matter
- Practice gentle play with younger siblings
- Discuss what to do if they see someone else get hurt
- Keep emergency numbers visible where kids can see them
Your Dental Emergency Preparedness Kit
Being prepared helps you stay calm when accidents happen. Put together a simple kit and keep it in an easy-to-reach spot:
Essential Items:
- Your pediatric dentist's emergency contact number (save it in your phone too)
- Hank's Balanced Salt Solution (check expiration date yearly)
- Small container with lid for storing a tooth
- Sterile gauze pads
- Small flashlight (to see in the mouth)
- Children's pain medication (ibuprofen and acetaminophen)
- Cold packs
- This guide or key information written on a card
Digital Tools: Consider downloading apps like ToothSOS, which provide step-by-step guidance during dental emergencies. The app helps you identify injury types and walks you through proper first aid.
When to Seek Immediate Care
Always call your dentist or go to the emergency room right away if your child has:
- Any knocked-out permanent tooth
- A tooth that's loose, cracked, or moved
- Heavy bleeding that doesn't stop after 15 minutes of pressure
- Severe pain
- Visible nerve tissue (pink or red spot in a broken tooth)
- Injuries to the lips, tongue, or inside of the mouth that might need stitches
- Signs of infection (fever, swelling, foul taste or smell)
For baby teeth, call your dentist during office hours for:
- Minor chips or cracks
- Slightly loose teeth
- Questions about whether a tooth needs evaluation
Working with Your Pediatric Dentist
Building a relationship with a pediatric dentist before an emergency happens makes trauma situations less stressful. Pediatric dentists complete 2 to 3 extra years of training beyond dental school, focusing entirely on children's unique needs.
Our practice in Lafayette provides emergency guidance and can see your child quickly when injuries happen. We understand that dental trauma is scary for both kids and parents, and we work to make treatment as comfortable as possible.
Final Thoughts: You Can Handle This
Seeing your child hurt is never easy, but now you have the knowledge to respond effectively. Remember these key points:
- The first hour after permanent tooth loss is critical
- Never replant baby teeth
- Store knocked-out teeth in cold milk if you can't replant immediately
- Different injuries need different treatments
- Follow-up care prevents long-term complications
- Prevention through mouthguards and home safety makes a big difference
Save your dentist's emergency number today. Practice what you'd do in an emergency so you're ready if it happens. With quick action and proper care, most children recover completely from dental trauma and keep their healthy smiles for life.
Stay calm, act fast, and know that help is available. Your preparedness today protects your child's smile tomorrow.
.png)